First thing you need to do is; prepare the ingredients and the items needed to make your pavlova.
Ingredients:
- 4 egg whites.
- Fine sugar.
- Corn starch / Corn flour.
- 1 lemon.
- Whipping cream.
Items that you shall need:
- A whisk.
- A baking pan.
- Baking paper.
Okay, so lets start with the meringue base.
Oops, before THAT, preheat your oven / microwave to 150 degrees celcius.
First, separate the white part of 4 eggs from the egg yolks, and put them in a mixing bowl. Like so:
Then, whisk till it becomes frothy. Y'know, like, all bubbly and stuff. Only once it is frothy that you should start adding one by one tablespoon of fine sugar, whilst whisking so that they blend together. I actually began whisking manually, but then it proved to be too tiring and I was getting nowhere near the end results.
So I strongly suggest that you use an electronic mixer.
Now, the recipe that I referred to suggests that you should add up to 4 tablespoons of sugar. But mine exceeded that, coz with just four spoon, my mixture couldn't reach the wanted consistency.
So make sure to add the sugar little by little, and stop once your mixture reaches peak form. This basically means that when you take the mixer / whisk out, the mixture will stand up.
To further confirm that your mixture has reached its required consistency, hold your mixing bowl up in the air, and tilt it entirely. You know your mixture is A-okay when it doesn't drip / fall. Like so:
Next, add in 2 tablespoons of corn starch / corn flour and 2 teaspoons of lemon juice.
I don't know exactly why you're required to do so, but I have complete faith in Anna Olson, so don't question. Hahah!
Though I should remind to not mix the corn starch and lemon juice with the electronic mixer, but by doing it manually. This is so the mixture is not overly whisked, which could result in it being a complete waste of ingredients.
I found out the hard way towards the end. So trust me.
Next; Line your baking tray with baking paper.
And then, scoop your mixture onto the baking paper, according to the size you want your pavlova to be. Since I was skeptical about whether it really worked or not; I placed a way too generous amount (more like not generous AT ALL, really) as a test run, before I proceed with using the rest of my mixture.
You don't have to do this, honestly. Coz if your mixture's right... it'll turn out good. Why don't you need a test run?
Well, because when you do one, you leave the rest of the mixture exposed for an hour, so it'll eventually come down, and its consistency would no longer be the same as the time you finish whisking it. Thats what happened to me.
So sad. :-(
Before you place the baking tray into the microwave / oven, set the temperature lower, to approximately 120 degrees celcius. If you don't know how on Earth to do that, like I did, its okay to have it at 150 degrees celcius.
If you're worried that it would turn out bad, check every 10 minutes or so.
So, once you've placed the baking tray inside said microwave / oven, set the baking time to ONE HOUR. :-)
Whilst waiting: Worry. Or shop for shoes online. Like I did.
But the better thing to do is: To prepare the whip cream.
I think you CAN just use those whip creams that you spray out of bottles, but its kinda cooler (coz come onnn we all wanna be UBER cool, righttt?!) if you just buy the whipping cream sold in boxes, and whip them (with the electronic mixer) yourself.
This is the result:
The key is not to under-whip, or over-whip. You know that its under-whip when it runs. It should be of a consistency where when you spread them on top your meringue base, it won't run and drip and stuff.
Once you reached that consistency; STOP. Coz you WILL ruin it. I learned this the hard way as well.
After your meringue base is done, slab an amount of whip cream on top, and decorate with fruits. The fruits you put on top are actually very important, coz the meringue by itself will taste just sweet, and the whip cream.. err... doesn't even have a defining taste of its own.
So the fruits help to make the dessert all the more delicious.
I placed kiwis on my test run. And it tasted goooood. :-9
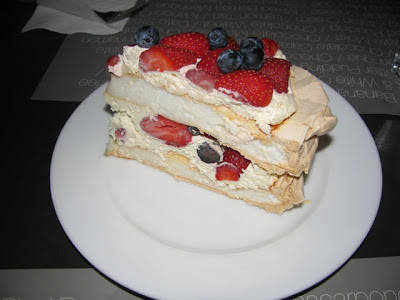
Unfortunately for me, the rest of mixture was already ruined when my test run was done. So today, my sister and I made another one that I intended to make look like the one I ate @ Alexis in Bangsar;
But our meringue base rose too far up, so the surfaces weren't linear. And I have no idea how they manage to get the meringue's inner layer to look so pretty. -____-"
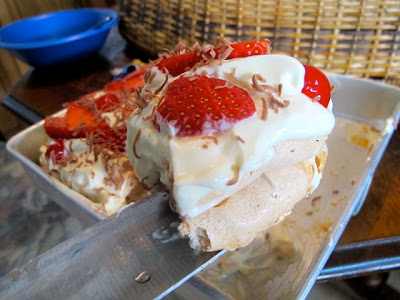
So I'm gonna keep trying till I get it right. But for now, this is the best yet:
I used strawberries and cherries. Ohhh and of course, shaved Cadbury chocolate!
I even bothered with cutting up the strawberries into heart shapes. -______-"
Tadahhh! Theres actually two layers of meringue here, but its not apparent.
Ahh it doesn't matter. It won't be long till Alexis and Delicious will run out of business. *evil laugh*
Okay, now its your turn to give a try! HEY HO LETS GO! :-D
**UPDATE**
Everyone loved it. I'm still awesome. And Mama wants me to make one to serve at Sunday class @ Al-Khaadem. But first I need to perfect the meringue so that it can be cut nicely without breaking apart.
YAY!


No comments:
Post a Comment