
Okay SO. This...

... was bought like, 5-7 years ago @ FCUK, One Utama. And yeah, throughout all those years of owning this piece of outerwear, I can recall wearing it only twice. Or maybe three times; TOPS!
I don't know what it was. Back then, I liked it. Okay I'm gonna be honest and say it might've been also influenced (a teeny weeny bit) by my sister Lisa, also purchasing a denim jacket and back then I liked just about every one of her clothes.
But further along the way, I discovered that I actually disliked the wash of it. And the fit. HOGAY. A bit unflattering if I may say so.
If you're suggesting that that might be my OWN fault for not being of a desirable body mass... Then SHUT UP! Teehee. Pretty please.
I didn't want to throw / give it away, so its been months or even maybe a year back that I've been planning to rip it apart and dip it in bleach. I think it was during the phase where I was a tad bit obsessed with Agyness Deyn, her Rock & Roll-ish fashion, andddd her extensive collection of studded, items and Doc Martens.
Yeah. Definitely.
So first thing's first:
(1) Remove the sleeves.
Now, a lot of people would tell you to take the sleeves off by carefully cutting it along the seams. Like so;

But since I'd like my end result to look as messed up as possible, I just cut the whole thing off from the inside:
Along this line:

Yes it is ziggy-zaggy. But whats important here is that you just get the sleeves off. If you're gonna go prim and proper then... IDK. Get tips from Marc Jacobs.

*snip snip snip*
Do the same on both sides, and you'll be left with something that looks like this:

I can't help getting excited once I reached this point. Coz the sleeves are THE WORST part about the whole thing, and getting rid of it was nothing short of pure satisfaction!
*breathes sigh of relief*
NEXT, (2) Take off whatever it is that you don't like about your jacket!
In my case, I got rid of the button coz its fugly and wouldn't fit with the final concept that I had in mind AND because one of it has already fallen off anyways.
I also ripped off the pockets. I didn't initially want to do this, but I tried it on at this point... and I find the pockets to be a bit awkward looking. So... goodbye!
**TIP!** Always try on the jacket (or now that it hasn't got any sleeves; vest) after every possible changes, coz you might never know.

Goinggggg and....

... Gone.
If you think the mark that the pockets leave irks you, simple; Don't take 'em off. As for me; Like I said, I really don't care what happens to it. As long as it retains its shape as a denim vest... then nothing else really matters.


I even cut off the jacket's hems coz... yeah. I don't think I need to explain why anymore.
Moving ON, probably the most time and energy consuming step;
(3) Doing some serious damage to the jacket.
Especially along the arm holes and along the no longer existent hem.
I suggest that you use;
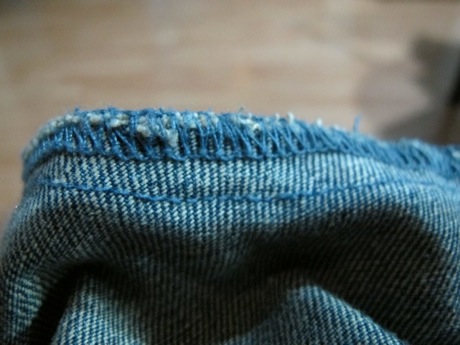
(a) Scissors. Just stab it around the sleeves and drag out the strays of denim so that said sleeves would look frayed / fringed like so:

But this picture was taken at the beginning of the process. I did A LOT more. Honestly, it took me about two days to finish. Coz I didn't do all of 'em for hours straight at a time, but only when I feel like it.
Continue with the hem:


My working space. :-P
**TIP!** A cheese grater does WONDERS.

Just drag the cheese grater onto the fabric and you shall have fringes.

I also dragged the cheese grater throughout other parts of the vest in order to achieve a distressed look. Don't be scared to poke a few holes in the vest as well! But don't go overboard! :-)
My favourite part of all this coz I've been wanting to do this FOREVARHHH:
(4) Bleaching.
Using a number of rubber bands or as Malaysians call 'em: Getah sayur, crumple your vest and tie it into a ball:

BUT if you're planning to thoroughly bleach the vest coz perhaps you just want it to be of a lighter wash, then you don't have to scrunch it into a ball.
Only do this if you want that tie-dye effect.
Then, prepare a bucket of water, preferred brand of bleach (Clorox is the only brand I know of) and, an old towel. So to prevent the bleach from dripping all over the place and perhaps ruin your flooring.

Pour the bleach into the water. Just saying; You don't need a bucketful of water, just one that's enough to immerse about half of your 'ball' of denim. Coz if you do, logic says that you'll need to put in even more bleach so that the ratio of water to bleach isn't too big.

I don't use exact ratios. Just dunk 'em. Follow your instincts!!
Then, carefully place your ball into the bucket.


And let it sit there for 10-20 minutes, depending on how light you want it to be. The key is to constantly check its progress. Don't forget to flip the ball the other side as well.

I wanted the spots to be of a slightly different colour tone than one another, so I poured a few drops of 100% bleach onto selected areas on the ball so that its colour run off faster, thus leaving that spot to be of a lighter wash once you're done.
Once you're satisfied, take the ball out of the bucket.

Take off all the rubber bands, and rinse the vest with cold water.
Afterwards, (5) HANG TO DRY!


I was soooo excited upon seeing the results from the bleaching process, and honestly couldn't wait till it dried. At one point, I even tried it on when it was semi-dry. COULDN'T HELP IT!! ^^
And finally:
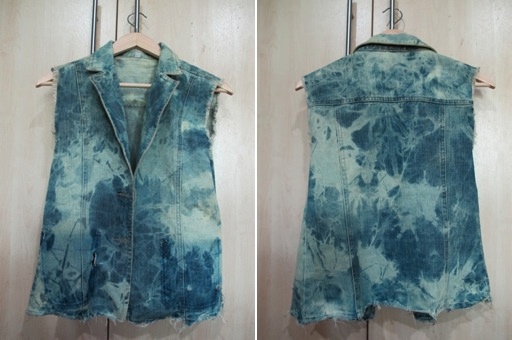
Your 'brand new' bleached denim vest.
:-)
P/S: I'm currently putting studs on the collars. Will edit this post with ze final outcome.
1 comment:
OMG! WOWO! i likeeeeee :P
Post a Comment